MRF Polishing for Manufacturing Optical Cylinders
Case Study: Manufacturing high precision mild cylinders with MRF polishing and stress mirror polishing
In the following article we describe a case study where MRF polishing was used to correct astigmatic operation of an optical cylinder.
Space telescopes are some of the most demanding applications when it comes to the quality of optical elements. The precision and accuracy required can be matched only when using most advanced manufacturing technologies. Solaris Optics took part in a project to deliver mirrors for the coude train of the auxiliary telescopes at Paranal Observatory, the second largest optical-infrared observatory in the world by light-collecting area.
The project was a collaboration of Solaris Optics, Military University of Technology (Warsaw, Poland) and QED Technologies (Rochester, NY, USA), a developer of manufacturing and metrology solutions for the optical industry.
Solaris Optics task was to manufacture a high-precision cylindrical mirror used to compensate for the astigmatic aberration in the system. The main objective was to reduce surface error much below full aperture specification. For reflective optics, this means that the fabrication process must be performed with strict control of the overall mirror figure and surface smoothness. Any imperfection leads to aberrations affecting the overall performance of the optical system.
Space Telescope Strict Requirements
Produced from Zerodur, a glass-ceramic composite widely used in earthbound and space-borne telescopes, the geometrical specification for the mirror included a diameter of 204 mm and a cylinder radius of 191 meters, which corresponds to sag 26,178 microns. The specification demanded surface error shall be kept under 65 nm PV over the full aperture. Such strict requirements demand the highest precision of the fabrication and measurement process. Equally important was how to make the process efficient, so the elements can be done promptly and at a reasonable cost.
Stress Mirror Polishing to Precede MRF Polishing
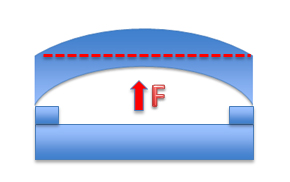
In the first step, flat and plano Zerodur block was used to form a preliminary cylinder surface using stress mirror polishing (SMP), a fabrication technique in which material removal is performed while the material block is deflected.
The block first is glued to a bending fixture which is then deformed to the inverse of the desired aspheric surface. In the next step, the mirror surface is polished flat. After the load is removed, the elasticity of the material makes the surface spring back to the desired form. In the last step, the block is rounded to the final 204 mm diameter. The advantage of this method is simplicity and high removal rate. Nevertheless for more demanding applications further finishing, such as Magnetorheological Finishing, needs to be applied.
Magnetorheological Finishing MRF to Exceed Precision Specs
Magnetorheological Finishing (MRF) technology, the second production step, was the key to reduce residual error to desired levels after the stress mirror polishing process. The technique uses a stream of magnetically-sensitive smart fluid as an abrasive. The workpiece is placed at a distance from a rotating spherical wheel. The electromagnet inside the wheel generates a magnetic field that pulls the stream of magnetorheological fluid to form a sheared layer of polishing fluid between the wheel and the piece. As the wheel rotates at high velocity, the magnetorheological fluid is pressed against the fabricated surface, hence performing material removal. MRF polishing is a subaperture technique, as the polishing tool comes in contact with only a small area of the mirror’s surface.
For other applications of Solaris Optics MRF polishing machine click here.
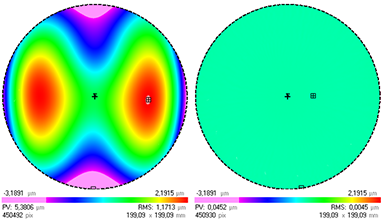
Sophisticated software controls the process to ensure stability and repeatability of every polishing cycle, allowing for finishing optics to < λ/20 PV demanded by space telescope applications. For the manufactured cylinders, MRF polishing reduced the full aperture PVr from 5.38 µm after stress mirror polishing to just 22.4 nm, way below specified 65 nm. This high surface quality was achieved without any significant edge effect.
Metrology of Space Telescope Cylindrical Optics
The manufacturing process for cylindrical optics is more complex than for spherical elements. This requires high standards from quality control systems. The SMP stage was verified using high-accuracy coordinate measuring machine (CMM), a process that yields precision but needs to be performed carefully as to not damage the element. During the MRF polishing, Solaris Optics team used Subaperture Stitching Interferometry (SSI) for proper control of the polishing process between the cycles. SSI is a non-contact measurement technique that allows precise measurements of high aperture optical elements. It combines multiple subaperture phase shapes into a full-aperture phase map with the use of stitching algorithm. The novelty in the project was measuring cylindrical surface as a deviation from flatness.
MRF Polishing Enables Cost-efficient Manufacture of High Precision Mild Cylinders
The project tested both know-how and equipment capabilities of Solaris Optics and the results were beyond positive. The process developed by the team allowed for precision cylinder mirrors to be manufactured cost-effectively and predictably. The fabrication flow proven to exceed the required specification, ensuring stable parameters for all the five mild cylinders produced in the scope of the project. A combination of efficient stress mirror polishing and high-precision MRF polishing processes resulted in cost- and time-efficient fabrication without sacrificing quality.
***
About the Project
Manufacturing high precision mild cylinders using classical stressed mirror polishing, MRF™ and SSI technologies
Part of the project for ESO Paranal Observatory: Manufacturing, Test and Delivery of Mirrors for the Coude Train of the Auxiliary Telescopes
Bartosz Szterner1, Mariusz Bienias1, Marek Broda1, Grzegorz Fluder1,
Chris Maloney2, Paul Dumas2, Jean Pierre Lormeau2,
Sławomir Gogler3, Arkadiusz Swat
1 Solaris Optics S.A. company, Józefów, Poland
2 QED Technologies Inc., Rochester, NY, USA
3 Institute of Optoelectronics, Military University of Technology, Warsaw, Poland
***


